I have to be on a manic phase. It's the only thing that it could possibly be right now.
For those of you not familiar with the manic phase of manic-depression, the closest description I can give is to imagine yourself on an inflated high with a false hightened ability to do anything at the expense of everything and everyone else.
Mania is the most wonderful part of being manic-depressive. Your creativity soars. You believe you can do anything and no one is going to stand in your way. You don't need sleep. You don't need to eat or take time out for daily things as your mind becomes obsessed with whatever you are focused on. It's the most amazing feeling until your body gives out because of exhaustion and you spiral out of control.
In this case, the focus has been on this quilt. Normally I crash and burn after a couple of weeks, stuff the project into a bag and forget it until I have the courage to get back to it. Not with this quilt.
I have been non-stop 12+ hours a day for several months now with no sign of exhaustion. It's totally consumed me and it's impossible to stop for food and other important daily activities. I've been obsessed over finding purple fabric when I wasn't able to sew. I've burned through a 5 pack of rotary blades in two weeks. I've gone through 6 yards of white fabric over the past couple of months. I've been obsessed with perfection on this quilt. I'm carefully drawing 1/4 inch lines on each white square and squaring up every block with precision. I want each row to not have any of the same fabric and it's taken forever to get very far with this quilt. Even while sleeping, I'm making this quilt.
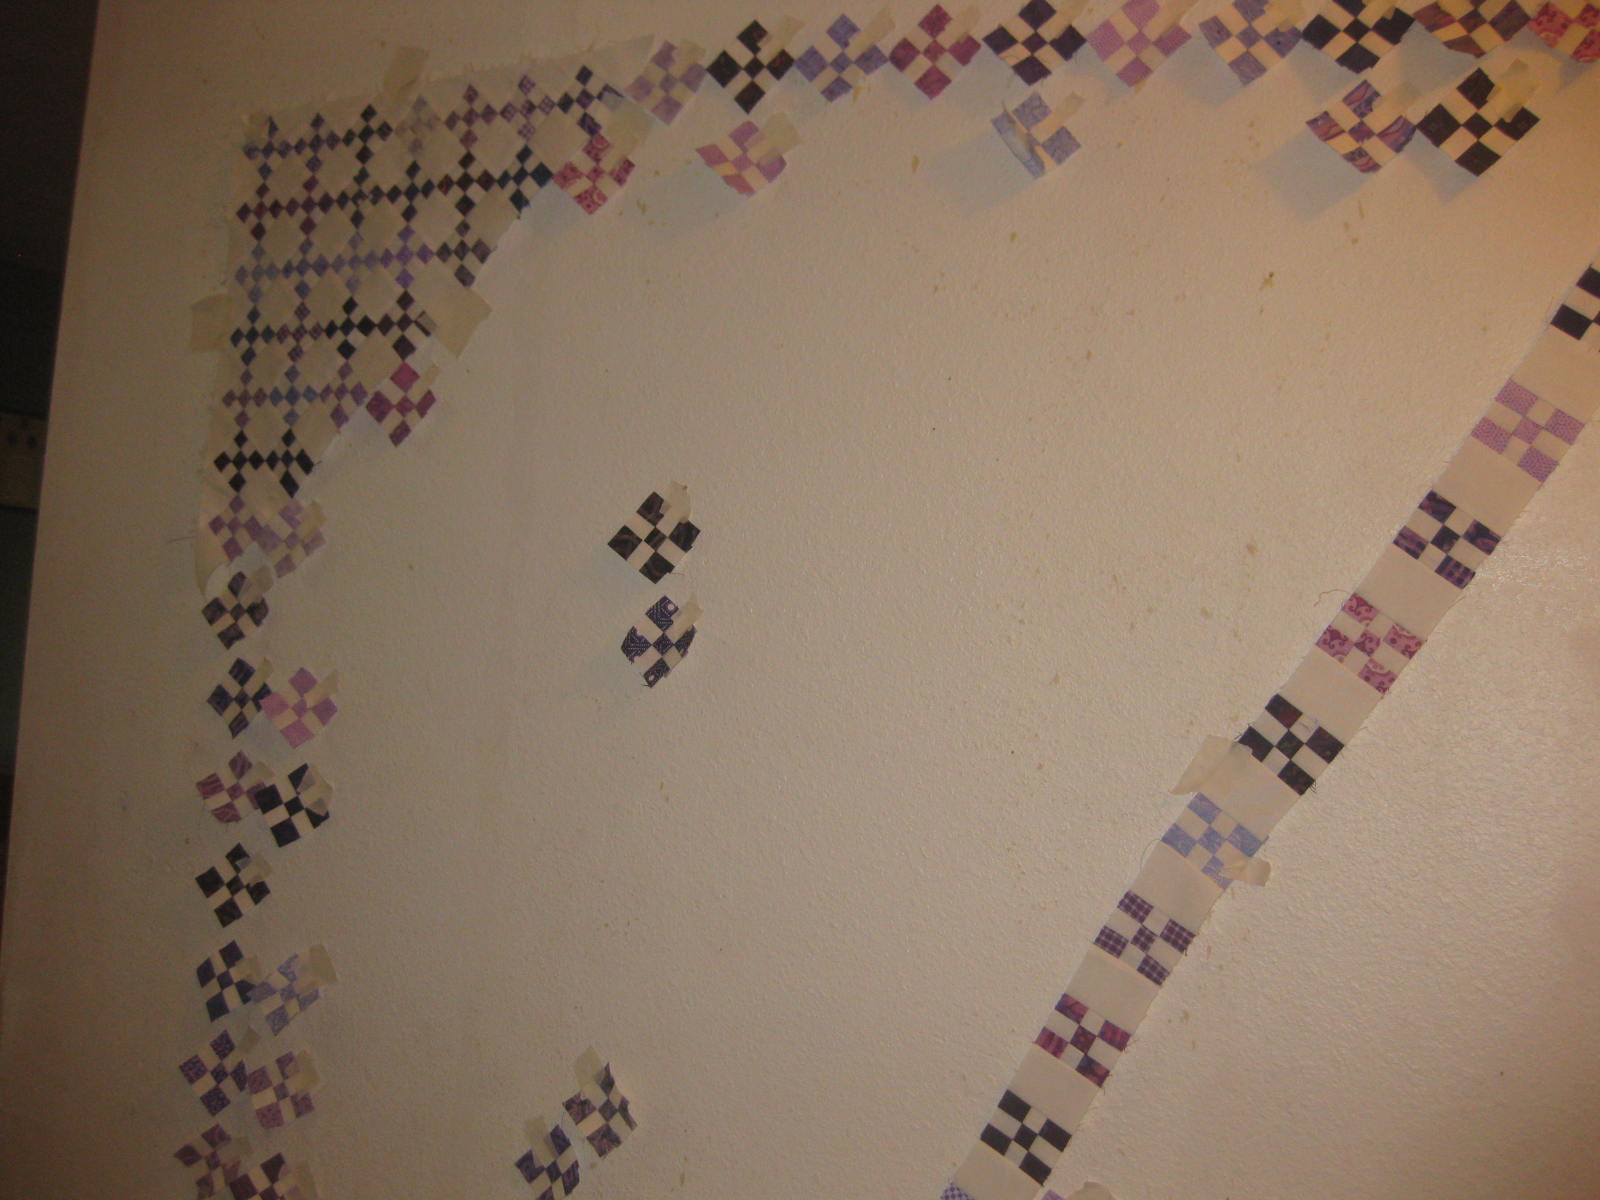
Here's my progress so far on the design wall:
In my search for perfection I've gone down and across making sure I don't have the same fabric. Then with the left edge of the quilt, I've put the same fabric squares across so that each vertical row will have that same fabric. Later, I'll move the squares up/down within that row. It keeps everything organized and I know how many squares of each fabric I have. Maybe it's not about perfection and more about organization.
I had to force myself to quit tonight because I can feel the exhaustion coming. If I force myself now, it won't be so bad later. I have to remind myself that I have plenty of time for this quilt and that it's okay to stop working on it.
I know I bought the Janome 7700 out of a manic high. I hope I don't regret the purchase later on. I do love the machine and SO glad to get rid of my 6600, but buying something on a manic high isn't the same as making a calculated informed purchase.
My Gallant Long arm is named Mr. PITA Bread. PITA as for Pain In the Ass. The goat is an inside joke with the AI which will never make sense. AI helps make things worse or better depending on what it thinks you want.
Saturday, May 29, 2010
Thursday, May 27, 2010
A Much Needed Boost
In frustration over this project, I went over to "Quilter Blogs" and started reading. I enjoy the blogs and I came across a"Wish Upon A Quilt" blog with a Spring Cleaning Challenge 6 entry. While not ready to tackle that challenge I went back a few entries to number 2. Basically; clean off your desk and gather your sewing supplies from around your area.
I sat there staring at my huge mess and figured I'd go for it. I cleaned off my table and set the strips aside. Then I hit the other table and started folding fabric. I found several rulers, two packages of rotary blades, rulers, a package of needles, and several of my scissors. I put everything away and then found the courage to start on the fabric and strips.
Anything that was fat quarter sized was put in one pile. Skinny pieces that had already been cut went into another pile. The same with yardages. I realized I had purchased two yards of the same fabric from two different stores. I may use that as binding.
Then I tackled the strips. I put fabric together with pins for sewing sets and found homes for the strip sets lying around. I put those on the sewing machine for later sewing.
Suddenly this project isn't nearly as daunting. I found several fat quarters that hadn't been cut up yet and put those on top. I found other piles of squares that need trimmed and stuffed them in my plastic bag so they wouldn't get lost.
Tomorrow I will work again on this project. Here's a much better organized picture:
Yardages, fat quarters and then strips
Thank you for so much for your challenge!
I'm Ready To Give Up Stripping
I'm tired of stripping. I need a new night job.
If I cut one more strip of fabric, I'm going to lose it in my giant piles. See this mess?
Even though I'm pinning sections together so the don't get lost, strips are missing. I've truly tried to keep organized, but strips and 9-patches are exploding everywhere.
If I square up one more 9-patch I'm going to go insane and I don't even have a fourth of them done. I lost count of my blocks awhile back but I know I'm not close to 1440 of them.
I finally got smart and used my shape cut template (duh) to do strips. It helps, but all I see are endless piles of fabric. I wish I could use it to trim down the 9-patches but it's too hard to be accurate with this small of a block.
After sewing several rows I got lost in keeping the fabric from not touching or being to close to one another. I then realized I needed to lay out the quilt. Sigh. More work. I started out on the bed laying out pieces and realizing I needed a more visual way to look at them. Duh. Use my hallway.
Here's the "design" wall, aka my hallway with my quilt:
Right now I'm working with 20 rows across and 20 rows down. The diagonal strip is the 20 square diagonal mark. I've spent all afternoon doing this. You'd think it would be easy, but it's not as I have to trim blocks down. I'm sure the tape will come off the wall leading to another mess. It will be gorgeous once it's done and that's what keeps me going.
I'd put the project away out of my mind, but to pull it all out again several months later would result in a bigger disaster.
Anyone feel like coming over to help? The only "help" I'm getting right now is from Bandit who thinks stealing tape from off the wall is a great idea.
Monday, May 24, 2010
Quilt Sandwich Test Outs On The 7700
I can't seem to find my camera. If you see it wandering out in cyberland, leave me an email and/or send it back.
*couple of minutes later* Ah. I knew that would work. I looked over and there it was. Dang cat knocked it off between the desk and the birdcage.
There's been a discussion on FMQ on the 7700 Yahoo! Group. I always feel terrible when several people can't get their machines to FMQ while the rest of ours works great. They've tried everything and nothing works. I wish I could cyberspace myself over to their house and help.
Then I realized I hadn't really done FMQ with the 7700 yet. I had done it with the demo machine and once for a couple of seconds at home. I made a quilt sandwich and made sure all the settings were from the factory. Then I could play around to see what works best.
First test:
Needle: Janome 70 sharp
Thread: Aurifil
Bobbin: Aurifil 50wt
Dial: 7
Tension: Auto
No problems but it wasn't until I tried another setting that it was just "okay" for stitch quality.
2nd test:
Needle: Janome 70 sharp
Thread: Hemingworth Rayon 40wt
Bobbin: Aurifil
Dial: 7
Tension: zero
Huge nests under the quilt. I knew that, but I wanted to see how much looping was there. It gives me the "I'm pathetic" baseline.
The next sets of tests were adjusting the tension discs up one time. My goal was to make sure that there wasn't any green Hemingworth underneath. Tension at 7 worked perfectly. White on bottom. Green on top.
3rd test:
Needle: Schmetz 90/14 Topstitch
Thread: Sulky Blendables 12wt
Bobbin: Aurifil
Dial: 7
Tension: 7
I knew this wouldn't work for long given the setup, but before the thread broke, it made great stitches.
I did the same with a size 100 Inspira Needle (Viking) to see any needle issues. The thread broke but stitches still looked great.
I made notes to myself so I would know which needles and settings I used.
After two hours of playing, the perfect setup was the tension at 5. Auto didn't make the stitches as pretty but was adequate.
Playing with the spring on the foot didn't make a difference in stitch quality. It didn't break the thread or cause issues. You just needed to to find the right level that works for you. Do you want the foot to be level, float, or up higher than the quilt? I like mine just gently riding over it. I love that I can adjust this height.
I was never into make quilt sandwiches or test stitches until about a year ago. I just wanted to start the project and "make it work" if something didn't fit.
My verdict on this machine for FMQ is that it's incredible. Once I got the settings I needed, there wasn't any issues other than user error. Even at high speed, I had control of the machine and the fabric. So far this is one machine I won't be naming "Damn It".
If you are cursing your machine I really recommend putting everything back at factory settings and starting over with a quilt sandwich. Take your time testing out each setting, write down your findings and keep it for further reference.
*couple of minutes later* Ah. I knew that would work. I looked over and there it was. Dang cat knocked it off between the desk and the birdcage.
There's been a discussion on FMQ on the 7700 Yahoo! Group. I always feel terrible when several people can't get their machines to FMQ while the rest of ours works great. They've tried everything and nothing works. I wish I could cyberspace myself over to their house and help.
Then I realized I hadn't really done FMQ with the 7700 yet. I had done it with the demo machine and once for a couple of seconds at home. I made a quilt sandwich and made sure all the settings were from the factory. Then I could play around to see what works best.
First test:
Needle: Janome 70 sharp
Thread: Aurifil
Bobbin: Aurifil 50wt
Dial: 7
Tension: Auto
No problems but it wasn't until I tried another setting that it was just "okay" for stitch quality.
2nd test:
Needle: Janome 70 sharp
Thread: Hemingworth Rayon 40wt
Bobbin: Aurifil
Dial: 7
Tension: zero
Huge nests under the quilt. I knew that, but I wanted to see how much looping was there. It gives me the "I'm pathetic" baseline.
The next sets of tests were adjusting the tension discs up one time. My goal was to make sure that there wasn't any green Hemingworth underneath. Tension at 7 worked perfectly. White on bottom. Green on top.
3rd test:
Needle: Schmetz 90/14 Topstitch
Thread: Sulky Blendables 12wt
Bobbin: Aurifil
Dial: 7
Tension: 7
I knew this wouldn't work for long given the setup, but before the thread broke, it made great stitches.
I did the same with a size 100 Inspira Needle (Viking) to see any needle issues. The thread broke but stitches still looked great.
I made notes to myself so I would know which needles and settings I used.
The top:
The bottom:
After two hours of playing, the perfect setup was the tension at 5. Auto didn't make the stitches as pretty but was adequate.
Playing with the spring on the foot didn't make a difference in stitch quality. It didn't break the thread or cause issues. You just needed to to find the right level that works for you. Do you want the foot to be level, float, or up higher than the quilt? I like mine just gently riding over it. I love that I can adjust this height.
I was never into make quilt sandwiches or test stitches until about a year ago. I just wanted to start the project and "make it work" if something didn't fit.
My verdict on this machine for FMQ is that it's incredible. Once I got the settings I needed, there wasn't any issues other than user error. Even at high speed, I had control of the machine and the fabric. So far this is one machine I won't be naming "Damn It".
If you are cursing your machine I really recommend putting everything back at factory settings and starting over with a quilt sandwich. Take your time testing out each setting, write down your findings and keep it for further reference.
Thursday, May 20, 2010
A Much Needed Laugh
I had the best laugh today. The missionaries showed up at my house a couple of hours ago. One is a newbie and only been out a week. He noticed my sewing machine and fell over with lust. He said his mom was head of a quilt guild in Utah and would die for the Janome 7700. He loved the 9-patch quilt I'm working on and thought purple was an awesome color to work with.
It's not often you get a 19-year-old boy know about sewing machines and quilting.
Tuesday, May 18, 2010
Bear, Cinni And Charlotte
Wow. When I uploaded the picture I realized that Bear has gotten bigger. I renamed her Bear since she looks like a black bear. I haven't posted pictures of my rabbits in awhile but thought you all might like to see them.
Cinni AKA Piddles (the brown one) and Charlotte are doing well. Cinni gets called Piddles because she still pees, usually on me.
I caught them in the act of rearranging furniture for the pictures:
I guess switching rooms isn't an option. It's taking the whole house with you.
The Dreaded Accurate 1/4 Inch Seam
I was watching YouTube yesterday on getting a perfect 1/4 seam allowance and getting a giggle out of all the ways we make this work. Tape. Moleskin. Fancy gadgets and others.
Here's my secret and it works every time: My acyrlic ruler and a mechanical pencil.
Your ruler dictates your 1/4 seam allowance. The machine and it's feet are callibrated to fit the measurements that the manufacturer sets, not always to your specific ruler. All rulers are not created equal which also makes for different "quarter" seams as well. That's why it's reccomended to buy the same brand for all your rulers.
With your ruler, align your fabric with the 1/4 inch guide and draw your seam guides onto the fabric. There's YOUR specialized quarter-inch seam allowance. If you are lucky, your machine foot will work with that line. Position the needle and foot to work together with that line and sew two pieces together and check your measurements. Sometimes you have to move the needle over just a little to compensate for the fabric fold.
You don't have to draw lines on all your fabric during a project. I do it for test samples on each project and then go from there. Sometimes each project has a different 1/4 inch seam allowance.
Right now with the 9-patch blocks that finish at 1.5 inches, I've drawn lines on each block for more precise accuracy. If the stitching line is off from that line, I redo it. Now that I have it set up right, I don't neccesarily need that drawn line. It's just there to make sure I didn't run off the road.
I hope that helps someone else find their true and accurate quarter inch seam allowance.
Subscribe to:
Comments (Atom)
