Saturday, February 28, 2009

"Flower Power" rose

Started working on the petals for my "Flower Power" class.  The yellow fabric is WAY too thin.  I didn't know that when I bought it.  It's a beautiful color.  

The photo:


From Quilted with Love


The fabric:
From Quilted with Love


The first layout:
From Quilted with Love

This is as far as I've gotten.  You can see how painfully thin the fabric is. Taking a picture also helps to see where I need more shadows and highlights, now that I have it online. For a first attempt, I figure I'm doing pretty good. I LOVE the background fabric and the contrast between the flower and the background.

Any ideas? 


New Look

I thought I'd try a new look.  Everyone else has been getting a make-over, so I thought I'd join in on the fun.  

What I love about my Apple is that I can design things like this:

From Quilted with Love


I can add the colors I want, the pictures, fonts..everything. This one is pretty basic but was really easy. No HTML formatting to figure out. I wish I could just drop and drag and create like this.

I'm still learning.

Friday, February 27, 2009

"Rhapsody Quilts" By Ricky Tims

I raided JoAnn Fabrics today while in Lincoln.  They had 40% off their quilting books and I came home with this:


From Quilted with Love

Now, I have a hard time getting excited about quilting celebrities.  I don't know why.  Jealousy?  Envy?  I think it's disappointment.  You do all this great work, yet you refuse to share the good stuff.  You show off your stunning quilts in magazines or in books, but don't really explain how you do it.  There are no patterns, no hints. 

Or if you do give a pattern, it's one I've done already or can easily do.  That's partly why I don't buy patterns/magazines/books anymore.  Yawn.  Been there.  Done that.  If you do a show, it's basic boring stuff that I already know.  Sometimes I think they just do stuff to promote the company and not what they want.

I have to eat my shorts with Ricky Tims.  This man is genuine.  I figured this book was going to be about showing off all his quilts with some bare hints on how he did them.  Or go on and on about why he chose this or that fabric and how wonderful he is.  Or go off on how if you don't own a Bernina you are a loser. 

He shows you EVERYTHING in this book.  EVERYTHING.  From basic design elements, to a master template,  expanding the size, designing the applique work, all the way to the finished project.  He wrote in a way that made you feel important.  That he really cared about your ideas and wanting you to finish the pattern.  He didn't talk over you or under you.  

Thank you Ricky.  I will treasure this book.  

Thursday, February 26, 2009

"Dingle Dongle"

This was a few weeks ago:

I about burst out laughing at the dealer when she talked about a "dongle" when I purchased the Topaz and software.  What the heck is a dongle??  Of course my mind is in the gutter and I'm thinking, "Dingle Dongle".  Sigh.  Now every time I hear/read the word dongle, I giggle.

After I set up the 4D Extra software (which was a huge PIA) I'm guessing a dongle is an external hard drive.  A very expensive hard drive.  I'm still learning the software and find myself using Embird and just downloaded "Ambassador", a free version from Micropulse.  As far as I know, 4D Extra and Embird don't give separate color layers to print out, since the Topaz doesn't have a touchscreen.  Ambassador does do that.  

My only gripe about software, none of it is made for the Mac operating system.  Good thing I have XP on the other side of my hard drive.

Sigh.  Now I'm giggling again.  

I'm An Aunt!!

My brother had a baby boy last weekend.  He's a very proud father and his wife is doing great.  I quickly put together a baby blanket and will send it off tomorrow.  I still get amazed at how well the Topaz FMQ with ease.  I love how this turned out.  I'm going to add a couple of Matchbox Cars for Joseph, his older brother.


From Embroidery Designs

Organizing Quilt Patterns And Embroidery Designs

I've collected hundreds of designs since starting machine embroidery.  Most can be downloaded making it even more tempting.

If you are new to machine embroidery..or even quilting.  You have to have a place for your designs/patterns.  I put my quilting patterns in plastic sleeves in alphabetical order into a 3-ring binder.
 
I have a separate binder for all my QuiltUniversity Classes.  

I have 2 binders of machine embroidery templates.  When I buy the designs, I print them out full size for placements with color charts and have them by the set, IE, Art Nouveau Floral Blocks. 
My designs are also on my computer and backed up on CD.  Always back up your designs on CD so if your computer crashes or your USB stick dies (I've killed 2) you still have them.

Here's how I organize my designs:

My beginning folder is labeled "Embroidery"

In the subfolders, I list all the online stores I purchase through.  Emblibrary, A Stitch A Half, Oregon Patchworks, etc.  Forget "Flowers", "Christmas"..too general and vague for me.

Under the online store, I list the designer I bought the design from.  IE, Oregon Patchworks, Janet Sansom.  Under the designer, I put the set I bought.  IE, Blackwork Designs.

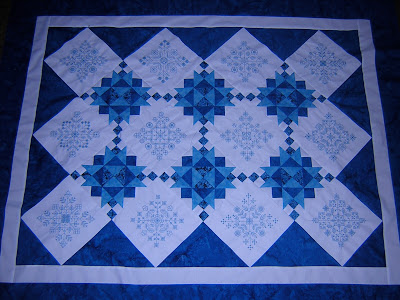
When I do a project I have an index card with the project, "Art Nouveau Floral Squares", where I got them, Emblibrary, the numbers, a list of threads I used, Madiera Rayon, and the fabric.  Kona Cotton Natural.  Then I stick it in with the templates.


From Embroidery Designs
I started doing this when I had changed colors from the patterns and couldn't remember which colors I had done.  If were to do the design over, I'd be guessing.

Adding Machine Embroidery To My Blog

I've decided to add my embroidery stuff to my quilting blog so the next few posts will be embroidery machine related.  

I started out with a Janome 350e but quickly realized I needed a machine with a larger hoop than the giga hoop.  What I didn't realize about the giga hoop is that it's actually two 5x7 hoops that overlap.  I thought I could put in a 6x6 design and stitch it out.  You can't.  You have to split the design in half.  No biggie, but the basic Janome software doesn't do that.  Nor does it convert formats.  Well...darn.  So I bought Embird, a basic software program that's not affiliated with any sewing machine company.  Great program.

My first attempt at using Embird to split a design and using the Giga Hoop.   Obviously, it didn't work.  The Giga hoop is a great hoop, but I found myself not really using it.  It's great for combining two designs, but I don't like having to split up one design to make it work.  I'm too lazy.

From Blogger Pictures

After buying a Sapphire 870 and falling in love with it, I realized Viking made the Topaz, an embroidery version of the machine.  Evil Viking Company.  How you tempt me.  Hubby said I could keep the Sapphire and get the Topaz 30.  Who are you and what did you do to my husband??  My husband won't admit it, but he likes quilting and embroidery.  Shhh.

From Embroidery Designs
The Topaz boasts one of the largest hoops in the industry of 360x200 which is partly why I bought the machine.  It can do an 8x8 inch block without splitting it.   The only catch to the Topaz 30 is that almost all editing needs to be done on computer.  There is no touch screen to see the layers and scroll through things like my Janome 350e does.  If you can get past that, it's an incredible machine.  It has most of the features of the TOL machines which I love.

Tuesday, February 24, 2009

Rotary Cutting Mats

Guide To Rotary Mats And Cutters


I had a friend call and ask about buying a cutter and mat.  She knew about them but wasn't sure what to buy.  As we talked, she had a better idea but was still lost.  I offered to have her come over and try mine before investing in them.  She doesn't do a lot of quilting, but the project she was working on really needed the rotary cutters.

My best advice is go to to JoAnn fabrics with a 40% coupon or when they go on sale.  

Mats

You have to have a mat.  The cutters need the mat so they don't go dull.  I know, because I went through 3 blades in 10 minutes until I went back to the quilt store and bought one.  Mats come in various sizes from large to small.  There is no bad brand of mat.  Look for one that has some thickness for the blade to work with and that is easy to see the fabric with.  

My favorite size for home use is the 24x36 size mat.  You can easily cut large amounts of fabric with one.
 
From Embroidery Designs

The 18x24 is perfect for classes and is a good beginner size mat.  This is the mat I bought 7 years ago and still works perfectly. 
From Embroidery Designs

The smaller mat sits perfectly on my 6600 table next to my machine.  It's perfect for paper piecing and trimming up blocks.  You don't have to get up and move back and forth from another table.


From Embroidery Designs


Using a Mat:

Mats have grid lines for measuring.  Not all mats have equal lines though.  Same with rulers as I found out too.  Line your fabric up with the lines and cut.  I use a ruler instead of the lines.  I cut at an angle as well toward the upper right corner so the grid lines mean nothing to me.  Some people turn the mat over where there are no grid lines and use them that way.

Care of mats:

Don't leave them on your kitchen table for your kids to put their dinner plates on.  They will warp your mat.  I use my kitchen table for cutting and forgot one night.  The thinner mats warp much easier than the thicker ones.  Same with cold. 

Don't leave them out in your car.  They warp there as well.  I know some people have managed to "unwarp" their mat successfully but try not to get them warped at all. 

Don't leave the larger mats up against the wall.  They will fold over.  Most of the larger ones have a hole to hang them up on.  I wish the smaller ones had a hole and even when I tried to drill a hole, I made a mess.

Don't use the same cutting line over and over.  You will eventually leave grooves on the mat.  All of the mats I have are 6-7 years old and you can see the cutting lines.  I do move around, but there are grooves where I've cut in the same place.

I don't know if you should do this or not, but I spray mine with a a basic kitchen cleaner to wash the mat when it gets dirty.  I don't do it often.  If someone knows how to clean off your mat correctly, let me know.

Mine have lasted years and have paid for themselves several times over.  Take care of them as they are an investment.


Sunday, February 22, 2009

Creating A Bargello Quilt In EQ6


I had a lady ask how to make a bargello quilt on EQ6. Her email address was under no reply. If you change your settings in blogger, it's easier to respond to you.

It's actually really easy to create a bargello quilt.

1. Go into EQ6 and set up a new project.

2. Go to the "quilt" tab and select "new quilt". Select Vertical Strip Quilt from the dropdown menu.

3. Go to Layout tab and you will have vertical strips. There is a menu off to the side that has more information. Delete all the strips but one. Under width, put 2. Under length, put an even number in. That will make it easier to have even numbers of blocks.

4. Under Select A Strip Style, click on "Pieced Blocks". If your number is even, you won't have gaps. Ie, 30 inches put in 15. You can see the picture off to the right. I haven't deleted the other strips so don't panic.

5. Put a checkmark under Clone the selected strip

6. click on Add and keep adding strips until you have what you want as in the picture below. You now have a template to play with.

7. Now comes the fun part. Play with the strips by sliding the width slider over each strip. Small strips make taller peaks. Wider strips makes the fabric appear to come forward.

8. To create a peak that is visually pleasing, add the same width on each side of the peak. If your peak measurement is 1 inch, on each side add 1.5 inches and move outward. You can see the variations of the widths of the blocks.


9.
Go to Layer One and start adding fabrics on a diagonal. You can go up or down. If you don't like the width of the strips, change them until you find a layout you like.


I just played with a few colors and ideas to get the idea.

Wednesday, February 18, 2009

"Flower Power" Class From QuiltUniversity


I've spent the past couple of weeks taking Susan Brittingham's "Flower Power" class.  She does a fabulous job and I've been working harder than I usually do for an art quilt.  She really makes you think about color in ways that almost hurts my color confused head.  LOL.

The rose on the left is the one I really love but Susan said it might be hard to do in an art quilt for a beginner.  The colors are subtle and finding fabric that would duplicate the look would be a challenge.  

I came up with another flower from my backyard

but not sure I like it.  Susan said the colors were easier as they weren't subtle and there was more to the picture.  

I've been working with both pictures using the methods we've been talking about.  I can see where Susan is right about the group of flowers, but even with taking out what I don't like, it just isn't "calling" to me. 

It just hit me.  I HATE the leaves in this picture.  The flower is called a Mallow flower.  I don't like how big they are and I find them terribly distracting and cluttered.  The flowers themselves are beautiful.  I'm just not sure how to fix it if I want to stay true to the way the leaves look in real life.  I'm not even sure how to work with the leaves in fabric.

Finding fabric for the mallow flowers has proven difficult but I think I found them from a lady that dyes her own fabric.  Even if the colors are off, they will still work. 


I bought a new toy yesterday called "Bamboo Fun".  It's meant for working with photo software and has a special "pen", mouse and pad to use.  The pen works like a mouse but is used by graphic artists for getting into places where a mouse is doesn't.  I really bought it because it has Photoshop Elements and a couple of other photo enhancing software.  

Here's what I did with the rose in Photoshop Elements:

It would look AWESOME if I could do it with fabric like this.  I don't think there's a way to do the chain link fence in fabric though.  I'll have to find a darker background.

When I tried playing with the mallow flower, nothing really worked.   When I enlarged it in EQ6 it looked better.  

Oh.  I've also learned that if you put a picture in your copy machine, it prints out in reverse.  

I can't wait to start working with fabric.  If I can find what I want and like.


Monday, February 16, 2009

Art Nouveau Floral Square Block

Wow. Had I known this block would take 5.5 hours to stitch out, I don't know if I would have bought the entire set. However; the design looks FABULOUS. I love it. Here's the block:

From Embroidery Designs


If you want to see more detail, click on the picture.

It has 20 color changes and I think took 16-18 actual thread colors. I love my Viking Topaz. Now to decide if I want to do the other blocks. This is a lot of work.

Wednesday, February 11, 2009

Heart Comfort Quilt

I talked with my mom today and after some coaxing found out that she's going through an extremely rough time in her life. I can't fix the problems and trials she's dealing with. I even tried to see if she would come out here for a visit to get away from things, but she won't. So I thought of a comfort quilt.

If anyone would like to send an 8 inch finished block of a heart design, please email me and let me know. I think it would mean a lot to her. I know I could just make her a quilt, but I thought having a quilt from other people would be more of a surprise and may cheer her up more than I could right now.

It's short notice, but if you could mail out the blocks by next weekend (the 20th), I could get it done and sent off to her by the end of February or early March.

If you could sign your block on the front as I thought it would be fun to have an album style quilt.

Thank you so much!

Tuesday, February 10, 2009

Blackwork Quilt Top Done!

I got my Topaz back from the dealer this morning. It got the update it needed and she said the up-take lever problem should be fixed. I sewed on it all afternoon without any problems. So far so good.

I got my Blackwork quilt top done today:

From Blogger Pictures


I'm not sure I like the white border width. I'm planning to do some some decorative stitching on the white so maybe it will soften it up some. If my editing skills were better I'd take some of the designs from the blackwork and put them together as a border.

Saturday, February 07, 2009

Topstitching My Mariner's Compass Quilt

I've spent the past 2 days topstitching my mariner's compass quilt.  I HATE stitching in the ditch and decided I'll do it the way I want to.  I like the look of topstitching and love how it looks.

Here's what the topstitching looks like.  If you can't see it, just click on the picture.


From Blogger Pictures


Here's the entire quilt:
From Blogger Pictures


I need to figure out what to put inside the points. I have some ideas and will work with them in the next couple of days. I loved designing and piecing this quilt. It will be one of my favorites.

Thursday, February 05, 2009

Blackwork Quilt Top

From Blogger Pictures


I took Gina's advice and didn't add the sashing. I put blue around the quilt and I think it's looks stunning. I LOVE this quilt so far.

My plan is to add a white border with blue stitching going down the center. I've got a couple of designs on my Topaz that might work. Then to add another blue border to finish it off.

Wednesday, February 04, 2009

"Quilter's Home" Magazine Article

*Don't read this if you are easily offended.  Just warning you now*

I just got my issue of "Quilter's Home" with so called controversial article.  My eyebrows raised a little at the quilts but I think Mark kept things within reason and tasteful.  There was nothing blatantly disgusting or revolting.  I even got a giggle or two out of it.  Jesus holding a gun made me laugh so hard after I got over the shock of "What??".  

The quilts are expressions of feelings that people can't always put into words.  One man does his quilts as he's a news cameraman and it's his way of dealing with what he sees everyday at work. Some are political statements and some are satirical.   

Mark did a good job of telling the story that goes with the quilts.  If I were to see it hanging in a quilt show, I'd be "Huh??" but understanding why the artist did the quilt made things more understandable.  I may not agree with the statement or think it's poor taste, but at least I understood what the quilter is trying to say.

Then there's the debate of whether or not they are quilts and if they even belong in quilt shows. Quilting is an art form.  It's each person's interpretation of what they like or want to say.  Each quilt tells a story behind every seam and and pattern.   Whether or not we agree or understand depends on how we see our own lives.  Do they belong in quilt shows?  For the most part quilt shows are conservative.  Most quilters would not enjoy seeing quilts like these.  If they are in a quilt show, I think they need their own special "gallery" so that those who want to see them can.  Those that don't want to can just walk on by.  I would not want to see these quilts.  They don't express my tastes or beliefs.  But they do represent someone else's.

For example.  My 3-D quilt has a story.  First I wanted to do a graphic style of quilt.  It's something I had never done before.  I liked the 3-d aspect of it and that the blocks appear to be floating.  The new technique of hooked feathers was new and I wanted to soften the hardness of the quilt.  The same with the butterflies.  

On an emotion level, floating is how I feel.  I'm holding on to the stability of the blocks, but I also know that I'm still floating through space and time.  It's a matter of perspective.  It's how you see things.  As a bipolar person and having epilepsy, stability is what keeps me sane in a world that to me is chaos because of what I deal with on a daily basis.  One block of stability is my family.  Another is the medications I take.  My friends, my hobbies and others are each represented in the blocks.  

The  feather quilting is an expression of peace and comfort.  Of elegance and sereneness. Knowing that despite my weaknesses, I'm still a beautiful person.  It's a reminder that I'm not a wreck or crazy.  The butterflies represent happiness and fun.  I love watching butterflies.  It's a reminder that I am happy.  I'm giving.  Designing a quilt that was chaotic, frightening or scary would not be useful to me in my life.  My life is not based on fear.

However; what appears to be a simple quilt with floating blocks has deep meaning to me.  The same with my other quilts.  I don't always say what they mean or need too.  We all make a particular style of quilt because it expresses us at the time we make it. 


Tuesday, February 03, 2009

3-D Quilt Done!!

I got it done!!   I finished my first quilt of the year.  And..*drum roll* I machine bound it with ease.  I can bind!!!   The quilt isn't flat, but the binding looks awesome.

From Blogger Pictures


The feather quilting and butterflies. Click on the pic if you can't see it

From Blogger Pictures

Picture of the quilting on top
From Blogger Pictures

The binding, which is perfect all the way around like this.

From Blogger Pictures


My secret to this binding: Viking makes a left edge topstitch foot. There's a guide on the left side that the fabric can slide through. Just follow the red mark with your fabric and away you go. I even made it over the corners without the seams folding over or being squished. It's amazing what the right machine can do for you. While the quilt isn't flat, the binding has no ripples or folds.

Okay Jen and Jill..what's the point status for this quilt??  Meandering or dwirling doesn't count.  I did feathers and butterflies.  

Monday, February 02, 2009

Epilepsy, Driving, And My Son

My son and I were talking the other day about me not driving.  Here's the conversation:

Son:  Mom, they need to make a car that drives itself so you can drive places.  It would know when to stop and to pass cars and everything.

Me:  That would be one expensive car.  I'd never be able to afford it if they made one.

Son:  Well, they should make something for people so they could drive.

Me: Actually; they do.  It's called a Hummer.  That way you go over things instead of hitting them when you have a seizure.  *feeling pleased with myself for the joke* 

Son: *pause*  Can we get you one?