Showing posts with label EQ6. Show all posts

Sunday, February 22, 2009

Creating A Bargello Quilt In EQ6


I had a lady ask how to make a bargello quilt on EQ6. Her email address was under no reply. If you change your settings in blogger, it's easier to respond to you.

It's actually really easy to create a bargello quilt.

1. Go into EQ6 and set up a new project.

2. Go to the "quilt" tab and select "new quilt". Select Vertical Strip Quilt from the dropdown menu.

3. Go to Layout tab and you will have vertical strips. There is a menu off to the side that has more information. Delete all the strips but one. Under width, put 2. Under length, put an even number in. That will make it easier to have even numbers of blocks.

4. Under Select A Strip Style, click on "Pieced Blocks". If your number is even, you won't have gaps. Ie, 30 inches put in 15. You can see the picture off to the right. I haven't deleted the other strips so don't panic.

5. Put a checkmark under Clone the selected strip

6. click on Add and keep adding strips until you have what you want as in the picture below. You now have a template to play with.

7. Now comes the fun part. Play with the strips by sliding the width slider over each strip. Small strips make taller peaks. Wider strips makes the fabric appear to come forward.

8. To create a peak that is visually pleasing, add the same width on each side of the peak. If your peak measurement is 1 inch, on each side add 1.5 inches and move outward. You can see the variations of the widths of the blocks.


9.
Go to Layer One and start adding fabrics on a diagonal. You can go up or down. If you don't like the width of the strips, change them until you find a layout you like.


I just played with a few colors and ideas to get the idea.

Tuesday, February 03, 2009

3-D Quilt Done!!

I got it done!!   I finished my first quilt of the year.  And..*drum roll* I machine bound it with ease.  I can bind!!!   The quilt isn't flat, but the binding looks awesome.

From Blogger Pictures


The feather quilting and butterflies. Click on the pic if you can't see it

From Blogger Pictures

Picture of the quilting on top
From Blogger Pictures

The binding, which is perfect all the way around like this.

From Blogger Pictures


My secret to this binding: Viking makes a left edge topstitch foot. There's a guide on the left side that the fabric can slide through. Just follow the red mark with your fabric and away you go. I even made it over the corners without the seams folding over or being squished. It's amazing what the right machine can do for you. While the quilt isn't flat, the binding has no ripples or folds.

Okay Jen and Jill..what's the point status for this quilt??  Meandering or dwirling doesn't count.  I did feathers and butterflies.  

Monday, January 26, 2009

Another Version Of My Blackwork Quilt

Another DUH moment. My friend Gina suggested to strip piece and cut the star sections (which I had thought of) but my EQ6 measurements would come up as 2 3/16 or some odd number. After trying several variations of blocks and going crazy of why my rotary cutting measurements kept popping up this way, I realized that I had the 1/16 inch mark checked. Sigh. It must be a default setting that I missed.

Now if I do the stars, each strip is measured at 7/8 cutting not some wacked out number to the 16th. I'm not sure I want to cut those measurements.

I may do this layout to keep me from having to deal with stars. I'll try strip piecing a star and see how it goes. I do like this one. Remember that the blackwork designs are around the blocks. I'll do some special quilting on the edges. And there may be sashing involved.

I did design the block below although I know it exists under a different name. I just needed it to be a divisible of 8 to make it easy to piece. I've had enough of odd size numbers. LOL! I do like this layout and the blues blend better and is easier on the eyes.

Friday, January 23, 2009

Blackwork Quilt Designs

Been working on a new quilt. I love blue and white quilts and fell in love with a Blackwork embroidery set of designs. I stitched them out in blue and am working on a quilt for it.

Here's a block from the set of Blackwork designs. I haven't trimmed the block down to size yet.

From Quilted with Love


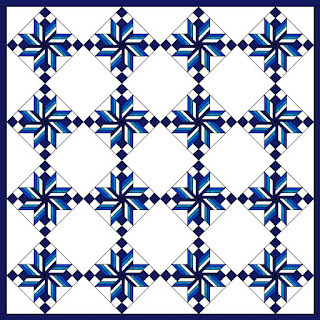
I played with several layouts and really like this one:
My worry is that the stars will overshadow the Blackwork blocks and they get lost. Paper piecing these blocks would take hours and I worry about losing interest in them.

The blocks are 8 inch blocks set on point. Even without the embroidered blocks, it would be a stunning quilt. I would just make the blocks a lot larger for easier piecing.

Here's another quilt that might work as well. It's much simpler but rather boring.


Thursday, November 06, 2008

3-D Block Quilt


I bought a new iron the other day. Wow. It's really nice and easier to use. So much lighter than my Rowenta.

I started working on my 3-D quilt blocks today. I pulled out my "Precision Piecing" DVD and watched it again. That's really helped and my blocks are coming out 9.5 inches like they should. It's taking forever to make one though. I need 30 blocks to make this quilt. 28 more to go! Kristie, you inspire me to put out blocks..LOL!

I really like how this is turning out. I may have to write up pattern directions now that I have a better idea of how to do this. EQ's rotary cutting chart is so useless. There is a really easy way to do this block with out cutting out templates or angled sides. I learned it from an old pattern I bought years ago. You cut out rectangles and squares and sew on the diagonal. Fold the square or rectangle over, press and cut out the extra underneath. Instant angle!

I had a seizure this morning while cutting out fabric. I'm SO glad I didn't cut my fingers. I usually have a warning before I have one so I was able to put the cutter down. Stupid epilepsy. Almost made it 3 months though. I just spent the morning sleeping off the seizure. Hubby said it was pretty long and hard. I still have my fingers..not complaining.

Saturday, March 08, 2008

Mariner's Compass Quilt finalization designs


I played some more with my Mariner's Compass quilts today. I'm a little closer to what I want but still not there. It's one of those "I know exactly what I want; I'll know when I see it" things.

I was hoping hubby would take me to a fabric store about an hour away today but he can't. They have funky hours and with hubby sleeping days that makes it so much harder. Epilepsy just sucks.

I've also thought about doing a whole cloth quilt using the mariner's compass. I did figure out that I can print the quilt full size (70x70) on about a zillion sheets of paper. Then I can tape them together and transfer them to freezer paper. From freezer paper to fabric and then machine quilt. I have 25 yards of white fabric. I'd have to do some more quilting to fill in the empty spaces, but it would work. Most whole cloth quilts are all flowery. I like the geometrics of this.